一. 请求和传递参数
在Vue中,发送请求一般是在created 钩子中,放在 mounted 中也没有问题
发送请求的前提是安装了 axios ,并且 import axios from ‘axios’ 成功导入
Axios官网链接
1. get 请求
- get 请求传参,在地址中已 ?xxx=xxx 的形式
1
2
3
4
| created(){
let res = axios.get("https://www.baidu.com?xxx=xxx");
console.log(res);
}
|
2. post 请求
1
2
3
4
5
6
7
| created(){
let res = axios.post("https://www.baidu.com",{
pageNum:1,
pageSize:10,
})
console.log(res)
}
|
3. 请求配置
1
2
3
4
5
6
7
8
9
10
11
12
13
14
15
| created() {
let res = axios({
url: "https://www.baidu.com",//请求路径
method: 'post', // 默认是 get 请求
headers: {}, // 自定义请求头
data: { // post 请求,前端给后端传递的参数
pageNum: 1,
pageSize: 5
},
params: {}, // get 请求,前端给后端传递的参数
timeout: 0, // 请求超时
responseType: 'json' // 返回的数据类型
})
console.log(res);
}
|
二. axios 的简单封装
目的:方便统一管理
注意:先安装 axios 才可以使用,终端键入:npm i axios,之后回车安装它
1. 配置拦截器
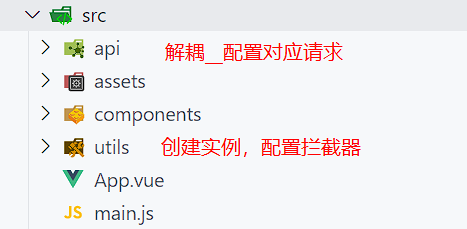
在 src 目录下新建 utils 文件夹,该文件夹下创建 request.js 文件
request.js 文件内
- 首先创建 axios 对象
- 添加请求拦截器(前端给后端的参数)
- 添加响应拦截器(后端给前端的数据)
1
2
3
4
5
6
7
8
9
10
11
12
13
14
15
16
17
18
19
20
21
22
23
24
25
26
27
28
| import axios from 'axios'
// 创建 axios 对象
const instance = axios.create({
baseURL: 'http://xxx.xxx.xxx/api', // 根路径
timeout: 2000 // 网络延时
})
// 添加请求拦截器 => 前端给后端的参数【还没到后端响应】
instance.interceptors.request.use(function (config) {
// 在发送请求之前做些什么
return config;
}, function (error) {
// 对请求错误做些什么
return Promise.reject(error);
});
// 添加响应拦截器 => 后端给前端的数据【后端返回给前端的东西】
instance.interceptors.response.use(function (response) {
// 对响应数据做点什么
return response;
}, function (error) {
// 对响应错误做点什么
return Promise.reject(error);
});
// 最终返回的对象
export default instance
|
2. 发送请求
在需要发请求的组件中,导入 request.js, 之后发送请求即可
demo.vue 组件
- 在需要使用的组件中 导入 request
- 直接发送请求即可
1
2
3
4
5
6
7
8
9
10
11
12
13
14
15
16
17
18
19
20
21
22
23
24
25
26
27
28
29
30
31
32
33
| <template>
<div id="app">demo</div>
</template>
<script>
import request from "./utils/request";
export default {
name: "App",
data() {
return {};
},
created() {
// get 请求
request({
url: "/course/category/getSecondCategorys",
}).then((res) => {
console.log(res);
});
// post 请求
request({
url: "/course/mostNew",
method: "post",
data: {
pageNum: 1,
pageSize: 5,
},
}).then((res) => {
console.log(res);
});
}
}
</script>
|
三. API 的解耦
API 解耦的目的:
- 为了同一个接口可以多次使用
- 为了方便 api 请求统一管理
1. 配置文件对应的请求
在 src 目录下新建 api 文件夹,该文件夹下创建 xxx.js 文件,配置对应请求
eg: ./api/course.js 文件
1
2
3
4
5
6
7
8
9
10
11
12
13
14
15
16
17
| import request from "../utils/request";
export function getSendCategorys() {
return request({
url: '/course/category/getSecondCategorys',
})
}
export function courseSearch(data) {
return request({
url: '/course/search',
method: 'post',
data
})
}
|
2. 获取数据
1
2
3
4
5
6
7
8
9
10
11
12
13
14
15
16
17
18
19
20
21
22
23
24
25
26
| <template>
<div id="app"></div>
</template>
<script>
import { getSendCategorys, courseSearch } from "./api/course";
export default {
name: "App",
data() {
return {};
},
created() {
// 获取一级分类
getSendCategorys().then((res) => {
console.log(res);
});
// 查询(有参数的传递)
courseSearch({
pageNum: 1,
pageSize: 5
}).then((res) => {
console.log(res);
});
}
}
</script>
|
文件结构如下: